
May 2024 M T W T F S S 1 2 3 4 5 6 7 8 9 10 11 12 13 14 15 16 17 18 19 20 21 22 23 24 25 26 27 28 29 30 31 Categories
-
Recent Posts
Mantenance Mode Tool
Hey Everyone,
There have been multiple requests for new features / tweaks in this project. I have converted it into a codeplex project and might be able to devote some more development time to it soon. I have not been able to work on it lately as my position at work has moved from a SCOM role to an Opalis role. That being said I do love this tool so I plan to continue to work on it / add new features. So, without futher ado
http://scommaintenancemode.codeplex.com/
Please feel free to use the disucssion boards for new feature requests (scheduling anyone?) and the issue tracker to let me know of any problems the tool has. Also, if anyone with some development background wants contribute rights to the project please let me know via the forums.
Posted in Management Pack Authoring
1 Comment
SCOM Maintenance Mode Tool – SP1 Version
Hey Everyone. I have finished the update to the tool to let it work with SP1 environments. The problem had to do with the way that I can query SCOM for objects. In R2 I can pull back only objects of the class I specify with the display name matches I specify. With the SP1 binaries I have to pull back all objects of the queried class type then filter by matching. So, what does this mean? The tool will take a long time to query classes with high instance counts. If someone with .Net experience wants to take a stab at making this more efficient let me know and ill send you the code. With that in mind, the tool now does in fact work! It is available HERE
Posted in Management Pack Authoring
4 Comments
SCOM Maintenance Mode Tool – Update
Wow people are using the tool! Since people have started using it in their environments I have been getting great feedback, please keep it coming!
Lessons Learned:
- The tool does indeed require .Net 3.5 (the .DLL complained of this when I was compiling in 2.0 but I ignored it, turns out that it really does want 3.5, fails out when you only have 2.0)
- The tool currently only works for R2. I will be releasing a version that works with SP1 here shortly as someone provided me with the .DLL files from a SP1 environment. The problem seems pretty straightforward.
Take-A-Ways
- A Web based version is going to be created. My goal with this tool is that our techs can run this from the server as they are working on it. The problem is that we cannot upgrade our servers to all run .Net 3.5, so, to satisfy this requirement I am going to be turning it into a web app. The good news on this front is that it is a requirement from the company I work for so I can do this update during normal business hours!
- A SP1 forms based version will have to be created / maintained separately. As I do not have a SCOM environment to test it against, I will try coding it but will be relying on the SP1 people to let me know if it is working or not!
- Because I am going to be implementing a Web Based tool I will be able to implement ‘scheduling’! Look for the next version to have a ‘Schedule Maintenance Mode’ button!
Posted in Management Pack Authoring
2 Comments
SCOM Maintenance Mode Tool
Introducing my SCOM Maintenance Mode Tool: Available Here
Features
- Detection of all Root Management Servers
- Instant Maintenance Mode
- Remote Maintenance Mode
- Start Maintenance Mode
- Stop Maintenance Mode
- Maintenance Mode Check
- This program was designed to be simple. In our environment it lives on a network share and we have a link on the desktop of each server pointing to it. The program defaults to running against the current computer. This program makes a call to the SCOM SDK to put the computers Windows Computer class and all subclasses into maintenance mode. This allows for ‘instant’ maintenance mode, once the program pops up and says that the computer is in maintenance mode, it is.


This tool requires the Microsoft.EnterpriseManagement.OperationsManager.dll which is available on any computer that has the SCOM agent installed on it. The install location is usually
C:\Program Files\System Center Operations Manager 2007\SDK Binaries
and you want the Microsoft.EnterpriseManagement.OperationsManager.dll
You then can put my executable and this DLL on a network share and run it from any of your computers.

Posted in Generic SCOM Information, SCOM Console How-To, SCOM tools
Tagged Maintenance Mode, Tools
9 Comments
Adding A Basic PowerShell recovery to a Monitor
This blog post is in response to a comment from Stephen. He tried to use my blog post on Adding a Restart Recovery to a Service Monitor in order to restart the winmgmt service. The problem is that this script will not work on winmgmt because it is dependent on WMI. Stephen has worked up his own PowerShell script to do the recovery, available on his blog. I will walk through how to add this recovery to a monitor.
The first thing you will notice if you try to do this is that you cannot accomplish this through the Ops Console, you need to use the Authoring Console. This is because the Ops Console only makes the VBScript module available for script based recoveries. In the Authoring Console we can use the PowerShell Write Action module for this. So, without further Ado, lets get this party started!
Open up the Authoring Console and make a new MP for this override (or export an existing override MP from your environment and add this recovery to it).


Make sure that the MP you imported or the MP you created has a reference to the sealed MP that has the monitor you would like to create the recovery for (if the monitor is in the same MP you can ignore this).

Now we can go ahead and make a new Recovery. Go to Health Model –> Tasks –> Recoveries and say create new custom recovery

Set the target to the same target as the Monitor you are trying to add the recovery for (in my example I will be adding a recovery to a monitor that is targeting my GMI.PSMonitoring.Base class – this is a monitor that runs a PowerShell workflow and only fires on servers with PowerShell so I know using a PowerShell recovery will be ok).

Choose the monitor you want the recovery to trigger off of and choose the Health State you want it to trigger off of. Note default timeout of 5 minutes is probably a good default

Next we create a new Action. This is where will will input the script. We want to use a PowerShellWriteAction module.

Now we can go ahead and edit it

The following is how the XML should look in order to run Stephen’s service recovery.
- We put the Name of the script in the <ScriptName> block
- Add the actual script to the <ScriptBody> Block (Note I also added a <![CDATA[ ]]> block surrounding the script which tells SCOM not to parse the script).
- Add a <Parameters> Block immediately after the <ScriptBody> block and before the <TimeOut> block
- Each <Parameter> block in the <Parameters> has to sections, a <Name> block and a <Value> block. Name refers to the Parameter name that the script expects to have passed, in this case svcName and the Value block represents what you want to pass as the value for that parameter, in this case winmgmt
- Set the <TimeOut> block to 300 which mean 300 seconds or 5 minutes (matches with the monitor timeout
<ScriptName>ServiceRecycle.PS1</ScriptName>
<ScriptBody><![CDATA[
# RestartService.ps1
# Author: STL
# Created: 6/22/2010
# Purpose: Restart service and dependencies
PARAM($svcName)
# Get dependent services
$depSvcs = Get-Service -name $svcName -dependentservices | Where-Object {$_.Status -eq “Running”} |Select -Property Name
# Check to see if dependent services are started
if ($depSvc -ne $null) {
# Stop dependencies
foreach ($depSvc in $depSvcs)
{
Stop-Service $depSvc.Name
do
{
$service = Get-Service -name $depSvc.Name | Select -Property Status
Start-Sleep -seconds 1
}
until ($service.Status -eq “Stopped”)
}
}
# Restart service
Restart-Service $svcName -force
do
{
$service = Get-Service -name $svcName | Select -Property Status
Start-Sleep -seconds 1
}
until ($service.Status -eq “Running”)
$depSvcs = Get-Service -name $svcName -dependentservices |Select -Property Name
# We check for Auto start flag on dependent services and start them even if they were stopped before
foreach ($depSvc in $depSvcs)
{
$startMode = gwmi win32_service -filter “NAME = ‘$($depSvc.Name)'” | Select -Property StartMode
if ($startMode.StartMode -eq “Auto”) {
Start-Service $depSvc.Name
do
{
$service = Get-Service -name $depSvc.Name | Select -Property Status
Start-Sleep -seconds 1
}
until ($service.Status -eq “Running”)
}
}
]]>
</ScriptBody>
<Parameters>
<Parameter>
<Name>svcName</Name>
<Value>winmgmt</Value>
</Parameter>
</Parameters>
<TimeoutSeconds>300</TimeoutSeconds>
After that your configuration should look something like

and now your recovery is setup! Save and import this MP into your environment after testing and have fun!

PowerShell Based Monitoring – Monitoring all Services on a Box
So I just saw a post on System Center Central asking about PowerShell based discoveries and asking for help. As I just went through this (ended up having to ask our PFE for an example) I figured I would blog about it. Below is the original request. With that in mind what I will whip up quickly is a management pack that discovers all services on a box (Multi-Instance Class) and then if the Service is set to Automatic monitor to ensure it is running.
Hi Everyone,
I am looking some examples to create basic powershell discovery in SCOM . I looked at the a couple of samples by ( Tenchuu and Stefan) but I am a little bit lost in those scripts so I am not good at with advance powershell scripting.
for basic, lets say I am running this cmdlet and get output something like this; I only want three property of each service,
get-service | select Name, DisplayName, MachineName
Name
DisplayName
MachineName
Dhcp DHCP Client Local
Browser Computer Browser Local
EventLog Windows EventLog Local
and so on for each service. I want to discover those three property with powershell
and lets say I create Class with has three property;
Name
DisplayName
MachineName
Can you guys give me a powershell script example for this?
I hope i explained well Thanks,
Orhan
Disclaimer (Read this)
This management pack is being designed to show how to use PowerShell to discover a multi-instanced class. This management pack is not designed to be used in a production environment due to the way SCOM scales out. See the following from our PFE on the potential impact of a MP like this in a production environment
Does this discovery discover each service as an instance of a class?
If so – that is BAD. VERY bad! SCOM instance space is not designed for this amount of instance space – and this will kill many large environments, or impact the config service to not be able to do it’s job in calculating config.
The standard for instance space is that we expect there to be an AVERAGE of 40 discovered instances hosted by an agent. So if a customer has 1000 agents, we expect about 40000 discovered objects, to be handled and managed by the config service.
Our scalability limits are based on this (6000 – 10,000 agents per management group).
IF your discovery discovers all services as instances of your class – that means the typical server will have 150 instances, in addition to our expected 40! While some management groups may handle this – many will absolutely puke…. Especially when we target monitoring to it. This absolutely unsupported, and a worst practice.
Now – if I am wrong, and your MP doesn’t do this – then no big deal.
A better solution is to discover only a single instance of the class – all services – and have a monitor run a script that looks at all services on a box, that are set to automatic, not running, and return an event to alert on in such a case. The monitoring script would be bad – in the amount of load it places on the agent since we would need to run it very often….. but the impact to the management group would be way smaller.
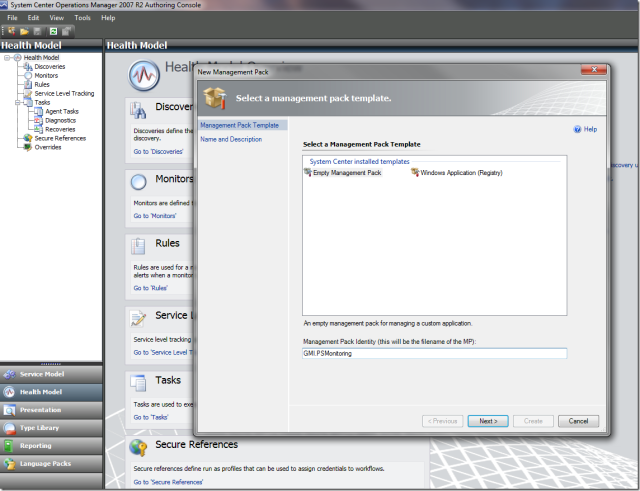
Implementation
Step one is ensuring that PowerShell is installed and configured on the server you are going to be monitoring. What I will do is create a ‘Base’ PowerShell Monitoring class that discovers everywhere that PowerShell is installed in my environment and store that in one management pack. I will then use that as the target for all of my PowerShell based discoveries.


I will Discover the version of PowerShell as a property of this Base class as it may have uses later (i.e. I can only do something in PS v2).

So now we have the class and just need to make a simple registry based discovery for finding all the servers with PowerShell installed.

I will be targeting WindowsServerOpertaingSystem for this discovery so that I discover against all of the Windows Servers in my environment

Discover my Base class and its properties

Simple registry based discovery

Since I am doing this against all servers I do not want to do this more than once a day

Find the key in the registry that indicates PowerShell in installed and copy the path

Setup the Exists variable. This is a bool (true [Key is there] or false [Key is Not there]) and we are looking at a Key not a variable under the key. The Name here is the name of the internal variable *Not* the name of the key (you can call it the name of the Key if you wanted but you do not have to). The “Path” is the path to the key including the actual key name with HKEY_LOCAL_MACHINE removed.

So now I have an exists variable that will tell me if PowerShell is installed or not, now I need to discover the version so I can populate that field. This time because I am accessing a registry value I select the Value radio button and append the Value name to my Key Path

Setup the condition to discover

Setup the Discovery Mapper (Note all Key Properties must have a value)

Now we have our Base PowerShell Monitoring class and discovery. Lets save this MP and seal it so we can reference it from another MP.


So now lets make the PowerShell based Service discovery and monitoring MP


Setup the references of this MP to reference our base PowerShell management pack


Create our new Class that we want to discover with PowerShell


Setup its properties (I have added Startup Type as I will monitor every service that is set to automatic by default)

So now we need to make our PowerShell based discovery. The easiest way in my opinion is to do this in two phases, script design and then embedding the script into our discovery.
So the first thing we want to do is get a list of the running services on the server which can be done with get-service in powershell
Get-Service

What I am going to do now is create a HashTable. A HashTable is a list of Keys and Values (each key has one corresponding value). For the keys in the table I will use the Service names and for the values I will create arraylists that will contain all of the properties.
$ServiceHashTable = @{}

Now what I want to do is loop though all of the services, and foreach service I want to create a new entry in the hashtable that consists of the Name of the service as the key and the Display Name and Machine Name as the properties (contained in an ArrayList)
Foreach ($Service in get-service)
{
$PropertyArray = New-Object System.Collections.ArrayList
$PropertyArray.Add($Service.DisplayName)
$PropertyArray.Add($Service.MachineName)
$ServiceHashTable.Add($Service.Name,$PropertyArray)
}

So now if I call $ServiceHashTable I will see what I have

I can then access any value Array by indexing the HashTable by serivce Name
$ServiceHashTable[“Browser”]
I can then index the different Values in the Value array like a normal array
$ServiceHashTable[“Browser”][0]
This will return the Display Name of the service Named Browser
$ServiceHashTable[“Browser”][1]
This will return the Machine Name of the service Named Browser
The Value Array indexing is based off of the order we added them to the array above (we added DisplayName then MachineName)

I can also get a quick list of all the services in the HashTable by calling $ServiceHashTable.Keys
With this in mind I am now going to loop through all of the services in the HashTable and add the StartupType from WMI to the value Array. The first step is to look at how we pull information about a service out of WMI. To do that we use the Get-WMIObject command. We can specify the win32_service class and that will dump out all of the services and their associated properties
get-wmiobject win32_service

So now lets setup the loop
Foreach ($ServiceName in $ServiceHashTable.Keys)
{
$StartMode = (get-wmiobject win32_service | Where {$_.Name -eq $ServiceName}).StartMode
($ServiceHashTable[$ServiceName]).Add($StartMode)
}


Note this loop is not very efficient, it is calling get-wmiobject which returns all services for each service in our hashtable. The correct way to do this is to load up another HashTable with the key set to the Service Name and the value set to its startup type
$ServiceStartupType = @{}
Foreach ($Service in (Get-WMIObject win32_service))
{
$ServiceStartupType.Add($Service.Name,$Service.StartMode)
}

After you have that HashTable setup you can add the Startup Type to our initial Value Array quickly and efficiently
Foreach ($ServiceName in $ServiceHashTable.Keys)
{
$StartMode = $ServiceStartupType[$ServiceName]
($ServiceHashTable[$ServiceName]).Add($StartMode)
}

So now we have a HashTable with all of the values we want to return in order to discover our class. Because this is a multi-instance class (multiple instances of a ‘service’ running on any server) we need to use multiple property bags. Each property bag must contain all properties that we want to populate. In addition, because this class is hosted by windows computer, we must discover the PrincipalName Class of the windows computer. This means we need to have the ServerName passed to us as a parameter
So, now we loop through all of our services again and put them into property bags and then return all of discovery Data
#Start by setting up API object and creating a discovery data object.
#Discovery data object requires the MPElement and Target/ID variables. The first argument in the method is always 0.
$api = New-Object -comObject ‘MOM.ScriptAPI’
$discoveryData = $api.CreateDiscoveryData(0, $sourceId, $managedEntityId)
Foreach ($ServiceName in $ServiceHashTable.Keys)
{
$Name = $ServiceName
$DisplayName = $ServiceHashTable[$ServiceName][0]
$MachineName = $ServiceHashTable[$ServiceName][1]
$StartupTypeName = $ServiceHashTable[$ServiceName][2]
$instance = $discoveryData.CreateClassInstance(“$MPElement[Name=’GMI.PS.ServiceMonitoring.Service’]$”)
$instance.AddProperty(“$MPElement[Name=’Windows!Microsoft.Windows.Computer’]/PrincipalName$”, $ServerName)
$instance.AddProperty(“$MPElement[Name=’GMI.PS.ServiceMonitoring.Service’]/Name$”, $Name)
$instance.AddProperty(“$MPElement[Name=’GMI.PS.ServiceMonitoring.Service’]/DisplayName$”, $DisplayName)
$instance.AddProperty(“$MPElement[Name=’GMI.PS.ServiceMonitoring.Service’]/MachineName$”, $MachineName)
$instance.AddProperty(“$MPElement[Name=’GMI.PS.ServiceMonitoring.Service’]/StartupType$”, $StartupType)
$discoveryData.AddInstance($instance)
Remove-Variable instance
}
$discoveryData
So Putting it all together our Script looks like this
param($sourceId,$managedEntityId,$ServerName)
$ServiceHashTable = @{}
Foreach ($Service in get-service)
{
$PropertyArray = New-Object System.Collections.ArrayList
$PropertyArray.Add($Service.DisplayName)
$PropertyArray.Add($Service.MachineName)
$ServiceHashTable.Add($Service.Name,$PropertyArray)
}
$ServiceStartupType = @{}
Foreach ($Service in (Get-WMIObject win32_service))
{
$ServiceStartupType.Add($Service.Name,$Service.StartMode)
}
Foreach ($ServiceName in $ServiceHashTable.Keys)
{
$StartMode = $ServiceStartupType[$ServiceName]
($ServiceHashTable[$ServiceName]).Add($StartMode)
}
#Start by setting up API object and creating a discovery data object.
#Discovery data object requires the MPElement and Target/ID variables. The first argument in the method is always 0.
$api = New-Object -comObject ‘MOM.ScriptAPI’
$discoveryData = $api.CreateDiscoveryData(0, $sourceId, $managedEntityId)
Foreach ($ServiceName in $ServiceHashTable.Keys)
{
$Name = $ServiceName
$DisplayName = $ServiceHashTable[$ServiceName][0]
$MachineName = $ServiceHashTable[$ServiceName][1]
$StartupType = $ServiceHashTable[$ServiceName][2]
$instance = $discoveryData.CreateClassInstance(“$MPElement[Name=’GMI.PS.ServiceMonitoring.Service’]$”)
$instance.AddProperty(“$MPElement[Name=’Windows!Microsoft.Windows.Computer’]/PrincipalName$”, $ServerName)
$instance.AddProperty(“$MPElement[Name=’GMI.PS.ServiceMonitoring.Service’]/Name$”, $Name)
$instance.AddProperty(“$MPElement[Name=’GMI.PS.ServiceMonitoring.Service’]/DisplayName$”, $DisplayName)
$instance.AddProperty(“$MPElement[Name=’GMI.PS.ServiceMonitoring.Service’]/MachineName$”, $MachineName)
$instance.AddProperty(“$MPElement[Name=’GMI.PS.ServiceMonitoring.Service’]/StartupType$”, $StartupType)
$discoveryData.AddInstance($instance)
Remove-Variable instance
}
$discoveryData
#Cleanup Variables
Remove-Variable sourceID
Remove-Variable managedEntityId
Remove-Variable ServerName
Remove-Variable ServiceHashTable
Remove-Variable ServiceStartupType
Remove-Variable ServiceName
Remove-Variable StartMode
Remove-Variable discoveryData
Remove-Variable DisplayName
Remove-Variable MachineName
Remove-Variable StartupType
Now all we do is add this script into a TimedPowerShell.DiscoveryProvider


Setup the Basics in the Configuration then click “Edit” to add the script and Script parameter block to the XML

Paste the script in a <![CDATA[ ]]> block. This tells SCOM to not try and process the script


Now we need to add a parameter block as our script is expecting 3 parameters (sourceID, managedEntityId, ServerName). The Parameter Block goes right after the closing </ScriptBody> and before the <TimeoutSeconds> block. Each Parameter has a Name (corresponding to the Parameter name the script is expecting) and a Value to pass as the value for that parameter. SourceID and ManagedEntityId are internal SCOM things and can be referenced as $MPElement$ and $Target/Id$ respectively.
<Parameters>
<Parameter>
<Name>sourceID</Name>
<Value>$MPElement$</Value>
</Parameter>
<Parameter>
<Name>managedEntityId</Name>
<Value>$Target/Id$</Value>
</Parameter>
<Parameter>
<Name>ServerName</Name>
<Value>$Target/Host/Property[Type=”Windows!Microsoft.Windows.Computer”]/PrincipalName$</Value>
</Parameter>
</Parameters>
At the end the whole XML blog should look like
<Configuration p1:noNamespaceSchemaLocation=”C:\Users\G521601\AppData\Local\Temp\GMI.PS.ServiceMonitoring.Service.Discovery.xsd” xmlns:p1=”http://www.w3.org/2001/XMLSchema-instance”>
<IntervalSeconds>86400</IntervalSeconds>
<SyncTime></SyncTime>
<ScriptName>DiscoveryServices.PS1</ScriptName>
<ScriptBody><![CDATA[
param($sourceId,$managedEntityId,$ServerName)
$ServiceHashTable = @{}
Foreach ($Service in get-service)
{
$PropertyArray = New-Object System.Collections.ArrayList
$PropertyArray.Add($Service.DisplayName)
$PropertyArray.Add($Service.MachineName)
$ServiceHashTable.Add($Service.Name,$PropertyArray)
}
$ServiceStartupType = @{}
Foreach ($Service in (Get-WMIObject win32_service))
{
$ServiceStartupType.Add($Service.Name,$Service.StartMode)
}
Foreach ($ServiceName in $ServiceHashTable.Keys)
{
$StartMode = $ServiceStartupType[$ServiceName]
($ServiceHashTable[$ServiceName]).Add($StartMode)
}
#Start by setting up API object and creating a discovery data object.
#Discovery data object requires the MPElement and Target/ID variables. The first argument in the method is always 0.
$api = New-Object -comObject ‘MOM.ScriptAPI’
$discoveryData = $api.CreateDiscoveryData(0, $sourceId, $managedEntityId)
Foreach ($ServiceName in $ServiceHashTable.Keys)
{
$Name = $ServiceName
$DisplayName = $ServiceHashTable[$ServiceName][0]
$MachineName = $ServiceHashTable[$ServiceName][1]
$StartupType = $ServiceHashTable[$ServiceName][2]
$instance = $discoveryData.CreateClassInstance(“$MPElement[Name=’GMI.PS.ServiceMonitoring.Service’]$”)
$instance.AddProperty(“$MPElement[Name=’Windows!Microsoft.Windows.Computer’]/PrincipalName$”, $ServerName)
$instance.AddProperty(“$MPElement[Name=’GMI.PS.ServiceMonitoring.Service’]/Name$”, $Name)
$instance.AddProperty(“$MPElement[Name=’GMI.PS.ServiceMonitoring.Service’]/DisplayName$”, $DisplayName)
$instance.AddProperty(“$MPElement[Name=’GMI.PS.ServiceMonitoring.Service’]/MachineName$”, $MachineName)
$instance.AddProperty(“$MPElement[Name=’GMI.PS.ServiceMonitoring.Service’]/StartupType$”, $StartupType)
$discoveryData.AddInstance($instance)
Remove-Variable instance
}
$discoveryData
#Cleanup Variables
Remove-Variable sourceID
Remove-Variable managedEntityId
Remove-Variable ServerName
Remove-Variable ServiceHashTable
Remove-Variable ServiceStartupType
Remove-Variable ServiceName
Remove-Variable StartMode
Remove-Variable discoveryData
Remove-Variable DisplayName
Remove-Variable MachineName
Remove-Variable StartupType
]]></ScriptBody>
<Parameters>
<Parameter>
<Name>sourceID</Name>
<Value>$MPElement$</Value>
</Parameter>
<Parameter>
<Name>managedEntityId</Name>
<Value>$Target/Id$</Value>
</Parameter>
<Parameter>
<Name>ServerName</Name>
<Value>$Target/Host/Property[Type=”Windows!Microsoft.Windows.Computer”]/PrincipalName$</Value>
</Parameter>
</Parameters>
<TimeoutSeconds>300</TimeoutSeconds>
</Configuration>

You now have discovered the class! Now we can setup a monitor on this class that monitors to make sure that it is running. We will set it to ‘Check Startup Type’ which will only monitor the service / alert if it is set to “automatic”


Posted in Management Pack Authoring
1 Comment
A PowerShell Monitor for ‘Leaky Processes’ (Part IV Implementing the Monitor)
Now that we have created the Custom Composite monitor using it is just like using any other type of monitor. So, generically when implementing a monitor you have two choices:
- Put it on a pre-existing class (default disabled, enable for the servers you want to monitor)
- Attach it to a new class. Use discovery to control where this is monitored.
As this module is PowerShell based we cannot run it on all of our servers as not every server has PowerShell installed. Rather what I plan to do is create a ‘LocalApplication’ class for the ComputerRole. I will call this class PowerShell and use it is the target for all my powershell based monitors and rules. I will use the registry key for PowerShell as the determining factor for installed or not and discover its version as a property (this may allow me more functionality in the future if I ever utilize functionality exposed in 2.0 that is not exposed in 1.0). So, lets go ahead and do that!


So now we have the class, we need to setup the discovery to tell when we should monitor this class.


Choose the Filtered Registry type for Configuration

Daily Discoveries are just fine for our environment

Use Regedit to find Key and Values that we are interested in and say “Copy Key Name”

We will the use the Key as our exists variable (if this key is present on a server we say that PowerShell is installed). Paste the key name from your buffer into the Path area. Make sure to remove the HKEY_LOCAL_MACHINE part as the SCOM module defaults to HKEY_LOCAL_MACHINE.

Note: We chose Key for exists because we are just checking if the “Key” of the registry is there. The only two valid Attribute Types for “Key” are Bool or Check if Exists (which is the same thing as Bool). This will return True if the registry key exists on a server and False if it does not. The Name under properties is the name of the variable in SCOM not the name of the key.

The next thing I want is to discover what version of PowerShell this is. Again, look at regedit and grab the key location, remove the HKEY_LOCAL_MACHINE prefix and add \NameOfValue


The next step is to setup the Expression for the discovery. An expression for a discovery is a logical expression that must evaluate to True for the server to be ‘discovered.’ You base this logical expression on the information that you just gathered. In our example we will be saying if Exists is True then this server has PowerShell. Note you can access the variables you defined in the previous page with the …


The next step in the discovery is the Discovery Mapper. This is where we tell the class what the Properties of the class we are discovering should be set to (usually we are populating this with data we just discovered!). Note, all Values under “Key Properties” must be filled in. You can access properties of the parent class (target class for the discovery).

The XPATH Query convention for accessing the variables we defined previously is $Data/Properties/VariableName$

So now we just say OK and the discovery is setup


So now we have a class defined, a discovery that will only discover the class when PowerShell is installed, and a Composite Monitor powered by a PowerShell script to monitor for processes that are leaking handles. Lets put it all together and wrap this up!
Go to the Health Model –> Monitors Section and create a new custom performance monitor (could be any type but I would classify this as a performance monitor) under our new PowerShell Class.


The Next step is to setup the configuration of this Custom Monitor. Browse for a type and select the CustomMonitor Type we created in Part III.

Now setup the defaults for your environment

Setup your health

Setup your Alerts. In an alert the XPATH query to access a property bag value is
$Data/Context/Property[@Name=’VariableName’]$
Since we setup the property bag value ‘message’ in the script for displaying which processes have high handle counts I will include that in my alert description.

Set the Category to PerformanceHealth under options as this is a performance health monitor

You could also add some Product Knowledge to this alert to let people know what it is all about / where to find more information about handle count leaks. That is setup under the Product Knowledge Tab

This will open up Word and you can add whatever knowledge / links you would like to it. After that you are done! You can now import the management pack into your testing environment and begin playing with it! If you would like to download the .XML or .MP files that I created while making this demo it is available here
Posted in Management Pack Authoring
2 Comments
A PowerShell Monitor for ‘Leaky Processes’ (Part III Monitor Type Design)
So now we are to the point where we can make a monitor type for our shiny new data source. We can then use this in an actual monitor and start monitoring for this condition on servers!
Step 1: Create New Composite Monitor Type


Add in Member Modules. What we want here is the DataSource we created in Step II and then two condition detections, one for our NoLeakingProcesses state and one for our LeakingProcesses state.

We want to setup our configuration of the ProcessHandleLeak DataSource to push off setting the specific values for our variables until we actually implement the monitor against a class. So, to do this, we will again use configuration variables. This time we will use the ‘promote’ option in the Authoring Console which will automatically create the variables in the configuration schema pane (we will still have to define the value type – int, string, etc – though).


Now we add in our condition detections.


The next thing we have to do it determine the “Regular Composition”. This simply means for the State NoLeakingProcesses what does the flow through the monitor look like and what does it look like for the State LeakingProcesses?


The next step is to update the Configuration Schema. Note this time we do not have to create the variables (because we used promote) but we still have to set their types.

The Final Step in creating the Composite Monitor is setting up the overrides.

You now have now created your own composite monitor powered by a custom, PowerShell driven DataSource! Stay Tuned for how to use this new Composite Monitor to actually monitor for Processes that are Leaking Handles as well as the .XML Management Pack!
Posted in Management Pack Authoring
2 Comments
Basic Performance Metric Collection for Group
Step 1: Open SCOM Operator’s Console
Step 2: Go to the Authoring Tab
Step 3: Create New Rule


